

Mark’s here yet again and congratulations are in order as he has recently gotten married! So we thought this was a good opportunity to go though some tips and tricks on creating stunning wedding decorations. It is wedding season after all!
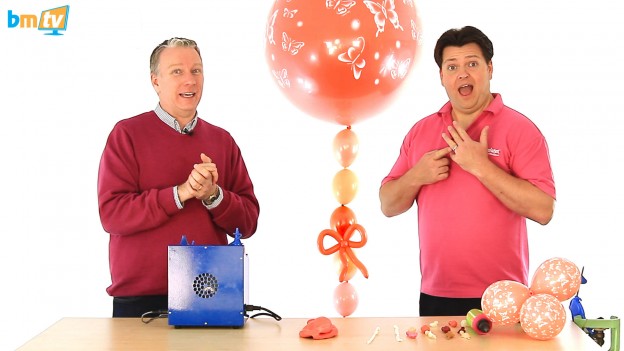
3ft double stuffed stunner
Believe it or not this 3ft balloon is made from 2 x 3ft balloons! Mark has taken one of our butterfly clear 3ft balloons and inserted a coral 3ft inside it. This means that you can make a balloon like this with any colour you wanted, matching the colours of your theme.

One of the reasons people are reluctant to use 3ft balloons is the helium costs involved in filled a 3ft can be expensive. You don’t need to completely fill a 3ft with helium however and we are going to fill this design with around 60/40 mix of helium and air. To do this, measure a 16” gap between two objects such as the backs of two chairs and inflate the 3ft until if just fits in that gap. Next widen the gap to 26” inches and inflate the balloon with helium until it fits the gap. A 3ft balloon can go bigger than this but we’ve found that you often can’t get this giant designs through doors, either at your shop or at the venue! 26” inches will fit between most doorways.
Some people struggle with how to tie the 3ft balloons so we will show the best method to do so. Mark takes the air out of a 260Q to create a tying point and lays it on the neck of the balloon. He scissors over the two balloons with his fingers and stretches the neck of the 3ft out. He then passes the neck around his hand and holds it with his little finger. Next he pulls the 260Q to relieve some of the pressure on his hand and uses the 260Q to pull the neck of the 3ft through the knot and that secures it! You can cut the bead of the neck of the 3ft balloon off at this point to make the knot a bit neater if you want.


Custom colour Quicklinks

Carrying on the double-stuffing theme, Mark has created some custom-colour Quicklinks to hold the 3ft balloon down. To do this; take a 5” latex balloon of your choice and insert it into a 6” Quicklink, Inflating and tying the inside balloon as you normally would. The colours will combine to create a unique colour that you could match to the colour scheme of the wedding, we know that brides can be very pantone precious!
There really is no limit to the range of colours that you could create so we recommend you experiment with a few and see what you can come up with. To help you get started, Qualatex have drawn up a custom colour chart. This also includes a colour chart of the full range of standard Qualatex colours for you to show your customers! Click here for the chart.
For this design Mark is mixing jewel, pearlised and standard balloons so you can really go wild with the colours. The specific colours that Mark uses are:
- Gold 6 inch Quicklink – Jewel Magenta 5 inch balloon
- Pearl Light Pink 6 inch Quicklink – Blush 5 inch balloon
- White 6 inch Quicklink – Orange 5 inch balloon
- Blush 6 inch Quicklink – Jewel Magenta 5 inch balloon
With the balloons inflated he then ties them into duplets and ties the duplets together to create a line to hold the 3ft down. Make sure that your ties are secure as the 3ft will have a lot of lift and you don’t want them to come undone and you lose the balloon. Mark recommends tying them in a double knot or even running fishing line through the design to keep the balloon secure.
5-balloon cluster base

Next is the base. To keep the theme running from the design of the 3ft, Mark inserts 5” coral balloons in 5” clear butterfly balloons and inflates. We are going to create a 5-balloon cluster for this as again it ties in with the rounded shape of the 3ft balloon. A 4-balloon cluster would give a square shape and it is important to keep your design consistent and have a running theme. Create two duplets with the 5 inch balloons, if you are unfamiliar with how to do this check out our 4-balloon cluster video here. Take the 5th balloon and tie it into one of the duplets as if you’ve forgotten that there is one extra balloon, you now have a triplet and duplet which you can fold together like you would with a 5 balloon cluster.
Mark has created another 5 balloon cluster out of 11” balloons downsized to 8 inches and attached that to a weight with the 5 inch cluster on top. You can then tie the Quicklink line into the base and your done. Well not quite yet…
160Q Bow
To finish of the design mark has made a cute bow out of a coral 160Q balloon and to demonstrate how he did this, Greg is going to have a go himself!

First of measure about a hand’s length on the end of an inflate 160Q coral balloon and make a twist. Bend the top round to make a loop and twist the loop when your first twist is. With the long tale make another loop and twist that in the same place. Next make a small bubble and then wrap the remainder of the balloon around one of your loops, keeping hold of the bubble and passing the tail through the loop. Make another bubble of the other side and repeat the process. The design is mostly complete! Just twist and cut of any excess balloon if one tail is longer than the other and tie to secure it. To make it look more bow like you can manipulate the balloon by pulling in the sides and bending the tails.
Tulle Bubbles
That’s not all we’ve got for you this week, next on the agenda is these bubble balloons with Tulle inside. Tulle is lighter than organza so it doesn’t weigh down the balloons so much so you can put a few inside the bubbles and even experiment with different colour Tulle. Mark is just going to demonstrate with the dark blue Tulle for now.

Take your deco bubble out and unfold it, place a little bit of air inside to open up the sides of the balloon. Roll out your Tulle, measure and cut 1.5ft of Tulle for a 20 inch bubble or 2ft of Tulle for a 24 inch bubble. Squash the Tulle into a straight roll and fold in the middle, don’t worry about creasing it as the creases cause the Tulle to catch the light nicely anyway! Twist the Tulle to give it a bit of strength, open the neck of the bubble and insert the Tulle by twisting it as you push in. Once it is past the neck you can bunch up the bubble and pull it in from the inside. It is a little fiddly but Mark did insert all 4 piece of Tulle at the same time so it can be done.


Inflate and tie the bubble with a 260Q (watch our episode on bubbles to see how to do this) then tie the bubble to nylon line and attach a weight. You can cut off some more lengths of Tulle and tie these in to the line to continue the theme, you can even tie at the bottom and push the Tulle into a walker weight.
Wedding Hearts & Filigree

And last but not least is this quick decoration that is made from a helium filled Hearts and Filigree foil balloon that is tied to nylon line and mini Hearts and Filigree’s stuck onto the line with the stretchy balloon tape. This is a great for offering something different to the standard bouquet of balloons and as it is made from foil balloons it will stay up for days!
That’s it for this week, see you next time.
Rob
As always, you can get in touch with us by commenting below, sending us an email or commenting on Facebook and Twitter. If you would like to receive these weekly video updates, you can either keeping checking this blog, subscribe to email updates in your account settings or you can subscribe to our Youtube channel.